This post contains affiliate links.
This month with Little Passports’ Science Expeditions kit, we got to explore Aerodynamics.
When the kit arrived, we started guessing what would be inside the box. For sure, we thought there were going to be paper airplanes. Eagerly my science kid opened it up and we were surprised – no paper planes, but there WAS a paper rocket!
He got to work on the book, doing all the comics and activities that teach you more about the topic of the month first. Then he got to work on making the projects.
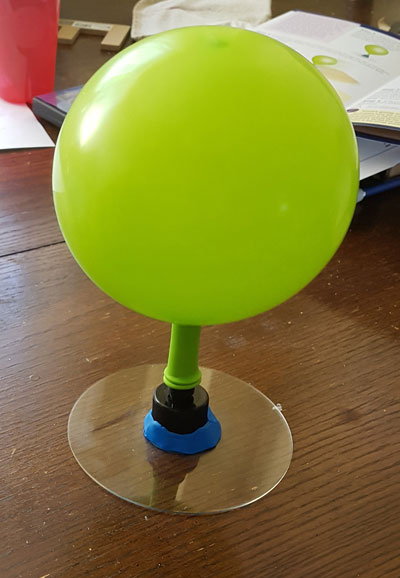
We started with a hovercraft. Our family has tried this in the past with moderate success, but our approach was different and I had to scramble around looking for all the things we need. Again, I love that everything is right inside the kit so you just need to grab the basic tools (like scissors and tape) and you can get started. This one took a little bit of teamwork. Blowing up balloons can be tricky and keeping them inflated while attaching them to the hovercraft was really hard for my 9-year-old. But together we managed to successfully get it built and launched. The younger siblings loved this – squealing as it floated across the floor. It took us a few tries to both find a good surface and to perfect the art of getting it started. Since hovercrafts use the downward force of air to propel itself above the surface, it’s able to smoothly slide across the floor. Our vehicle really liked to float to the same area of the room over and over again….. I’m guessing our floor isn’t level.
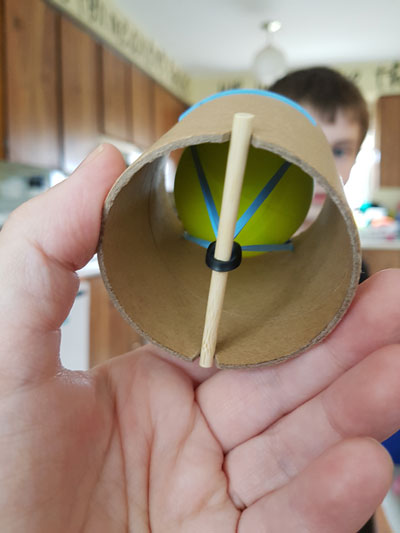
My scientist really wanted to work on the rest of the box himself, just to see if he could do it. Of course, the next project he picked was a ball launcher. In this project, you attach an elastic band into a small cardboard tube with a piece of dowel as a lock when you pull the elastic back. (Elastic Potential Energy, anyone?) Then you put a lightweight ping-pong ball inside, gently squeeze the bottom of the tube, and ….. POW! the dowel comes loose, the elastic snaps, and the ball goes flying across the room. My son was able to assemble this project without help, but did find the task of pulling the elastic back and “locking” the dowel in place a little frustrating. Probably because he was trying to push it down from the top instead of pulling it out the bottom. We actually tried a few different small balls that we had around the house – testing to see what results we had. We tried different launch techniques too, releasing the dowel manually instead of squeezing for example. It created a great opportunity to talk about making a hypothesis while experimenting.

We saved the best for last (in my opinion): The Stomp Rocket. The boy did all the creating on his own – carefully following the instructions to design his own paper rocket. He needed some help taping on the nose cone and fins. Using the box (I love how the company has incorporated even its packaging into the experiments!) we created a launch pad and then we headed outside.
I have to admit, this project was crazy fun. All the kids joined us out in our front yard as we tried to find a safe place to launch the rocket with losing it up in a tree or out on the road. We set it out on the driveway and got to launching. Each of the kids took a turn, some with more success than others, and eventually, they tried more than just a simple foot stomp. There were some crazy moments of super jumping onto the launcher to see if it would make a difference. I can’t say for sure that it did or not, but it was fun anyways.

Rockets are a great example of aerodynamics – using their pointy nose to push the air around the body and the fins to keep steady. When it is in the air, the rocket moves in sort of an arc shape, which is known as a parabola.
The kids loved the launcher so much, my son came running back from the community playground later that afternoon to grab it and use. When I looked down the street later, there were like 50 kids circled around the launcher and screeching excitedly every time it took off. They had a great time – at least until the rocket couldn’t handle it anymore and the paper tore. Thankfully, though, it’s not too hard to build another one!
Honestly, even after box #3, I’m eager to see what’s coming in the next kit. I’m loving the special time with my kids this is providing – and the fact that we’re learning things without even “school.” 😉 The instructions for the experiments are so cleanly laid out with lots of diagrams for visual learners that it really makes it simple to follow, but it also includes lots of great information about the science behind the projects that you are doing.
So far, we’ve done Forensic Science, Vision, and now Aerodynamics. I heard that next month we’ll be doing Solar Energy. Can’t wait to see what we’ll be doing.
Want your own Science Expeditions subscription? They are designed for kids ages 9+. The cost is $21.95 USD + $5.50 USD shipping to Canada if you pay by the month, or you can go for a year subscription which drops the price to $18.95 USD a month. It’s an annual cost of $227.40 USD+ $66 USD shipping to Canada if you do it that way.
You can find out more and buy a subscription at: https://thecanadianhomeschooler.com/sciencepassports
LITTLE PASSPORTS IS SENDING US A BOX EVERY MONTH SO WE CAN USE AND SHARE OUR EXPERIENCE WITH YOU. THIS IN NO WAY IS AFFECTING MY REVIEW – AS I PROMISE TO BE HONEST WITH EVERYTHING WE DO, GOOD OR BAD.

Every year, on a Saturday in early May, don't miss out on participating in Science Rendez-Vous - an annual one day, free Read more
Based out of Winnepeg, Portage & Main Press is a publisher that provides some outstanding materials for teachers. Divided into both Read more
Environmental education is something that our children need in order to better understand their impact on the world around them. Read more
One of my readers recommended this company and after some research I'm excited to bring to you a Canadian curriculum Read more

- Homeschool Spelling Essentials: Ways to Make it Engaging (and Canadian!) - October 4, 2024
- 10 Simple Homeschool Organization Tips For Busy Homeschoolers - September 16, 2024
- 5 Ways Homeschoolers Can Enjoy Back to School - September 10, 2024