This post contains affiliate links.
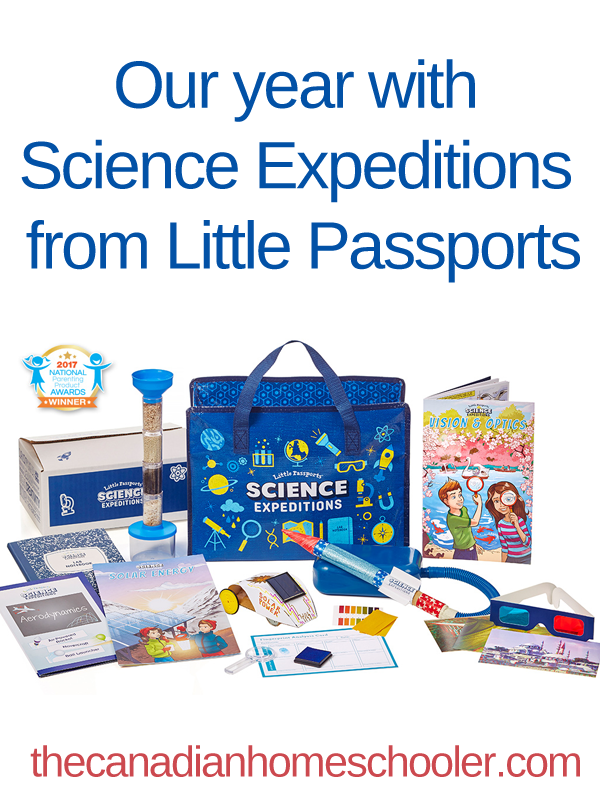
For an entire year, I was excited to be working in partnership with Little Passports to test out their new Science Expeditions series of monthly kits. Since my middle child is an aspiring scientist, it was a perfect fit for him. We completed every box that came through the door. Not just because the company provided them for us, but because they are just plain fun. In fact, I’d venture to say that these science kits gave us the most success for all our intentional learning experiences.
For each box, there were multiple experiments and activities, but each one also had a “big” one that really made it special for us. Here are some highlights from our year.
FORENSIC SCIENCE
This first month was all about Forensic Science. First, you need to read the fun, full-coloured comic book about Sofia and Sam – the two young people who are from the Little Passports adventures but this time are doing some power of observations to put some clues together to figure out where their aunt has disappeared to. The back of the story has several pages of activities (like learning to recognized forged handwriting and learning how to case a crime scene) and a glossary to help with relevant words.
Then it’s science time.
This forensic science-themed kit has 3 awesome experiments: extracting DNA from a strawberry, investigating fingerprints, and studying splatters. Materials are clearly marked – making it quick to grab what you need from your pantry and household supplies. The estimated time to complete these three projects is about 2 hours.
One of the neatest thing that is included in this kit is the Lab Notebook. The inside is filled with grid paper pages for experiment notes and observations. There is plenty of space for anything you are working on – and probably even some experiments of your own. In the front is a dedicated space with 12 hexagons where you stick your monthly achievement badges to show what you’ve finished. I love this because it gets the kids excited to do their experiments and earn their badges.
We started with the fingerprinting because the supplies were all included and it was simple to do. It was actually a lot of fun to look at all our fingerprints and compare how similar and different we were. This particular project ended up with many of the other kids because they were fascinated. A page of scrap paper of printing tests later, we were ready to try the real prints on the analysis page.
Next, we set up the kitchen for some blood spatters (made of paint… not real blood). My little scientist grabbed his homemade lab coat and safety goggles, set everything up, and excited prepped his lab observation book. The spatters experiment was really fun to do together. Together we tested blood splats from all different heights and what they looked like. The boy diligently wrote his observations in his lab book and we discussed our findings together.
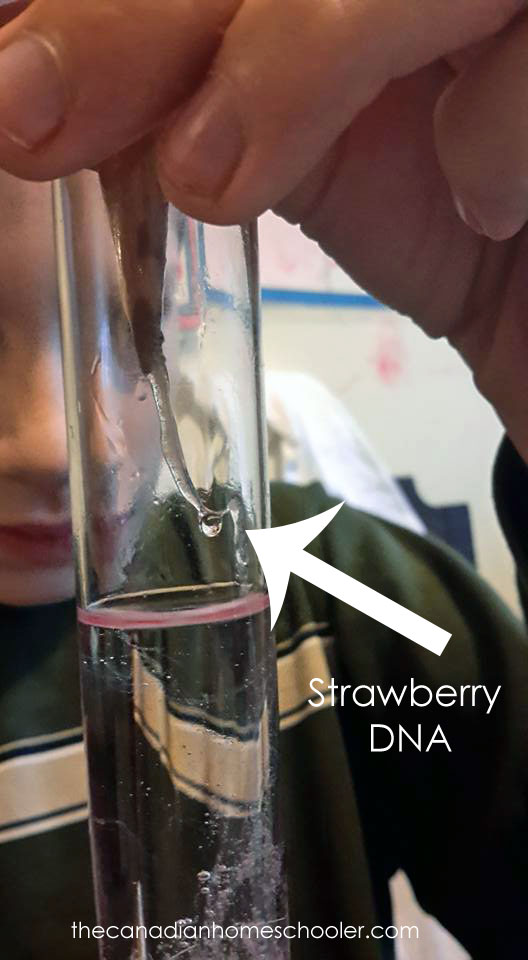
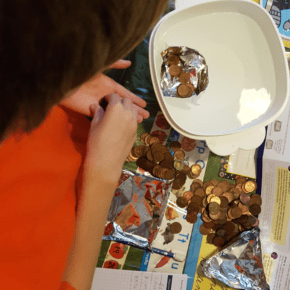
The last experiment that we did was the DNA extraction. The materials list calls for a couple of things we didn’t have around the house: strawberries and rubbing alcohol. It’s off-season for berries, so we ended up needing to go to two different stores before we found some. Later, while reading through the instructions, we learned that you can use many other kinds of fruit instead (however, strawberries have the best DNA). We bought strawberries and raspberries to try them both and see what would happen.
The instructions were easy to follow, making this experiment so fun. We watched our test tubes in anticipation. The strawberry turned out phenomenally – the DNA looked like a cloud of white blobbiness and when we gently pulled it out of the tube with the pencil, it resembled something like some clear snot. It was so amazing to know we were looking at the building blocks of a strawberry! The raspberry one, however, looked like nothing had happened. We decided to stick a pencil in any way and see what happened. There were teeny tiny little almost invisible strands in there. Apparently, you can do this experiment with lots of different items, including your cheek cells! Seeing your own DNA would be incredibly fascinating.
I asked the boy what his thoughts were about this kit and his very concise answer was “I love it.” He liked that the instructions were clear, that it came with an awesome lab notebook, and that all the not-likely-to-be-in-your-house supplies came with it. He loves the bag to keep all his stuff in, too.
BONES
One of the Science Expeditions Kit was all about bones. Admittedly my little scientist isn’t as into biology as other science topics, so he wasn’t really interested in doing this box at first. I decided to pull out the contents of the box and show it to my four-year-old, who was very excited discover parts of a skeleton inside. As we started putting it together, the rest of the kids seemed all migrate towards the table where we were working. Before you know it, we were all working on it together.

I will say that I found this month’s projects a lot more challenging than some of the ones in the past. The kids weren’t able to do them alone and I had to be quite involved to help complete them. However, some teamwork led us to finish everything successfully.
We started with the skeleton. The first step was the most challenging – attaching the rib cage to the spinal cord. The little tabs to stick into the spine were just incredibly small and didn’t cooperate with us. However, with some continuous persistence (and the sad eyes of a four-year-old motivating me to be successful), I managed to connect the pieces. From there I let the kids create the rest, adding the limbs and the skull. As we worked putting the pieces together, we talked about the bones that we were looking at. We felt them on our bodies and looked to see if we could see any evidence of the bones from the outside. Shoulder blades were a favourite as they are very easy to see. We mounted the skeleton on his little stand and the kids gave him the name Jimmy the Skeleton, proudly showing him off. I think it’s important to mention that the skeleton is not a toy but instead a model for display. He tends to fall apart if used for play.
The second activity in the kit was a robotic hand.
Basically, you create a hand that will bend and move along with your hand. It’s made out of paper, some straws, tape, and string. It was a little bit tedious but really neat when it all comes together and works at the end. This one took a little bit of problem solving to get it to work in sync your fingers. It really got us thinking about how we use our hands and how they work.
SOLAR ENERGY
The Science Expeditions box about solar energy was perfect to study during the sunny days of summer.
As always, we started off with the little book that came with the kit, reading the comic and doing the exercises in it. We learned a lot about how solar panels work, and something called the Albedo Effect. (That’s the amount of solar energy something absorbs or reflects).
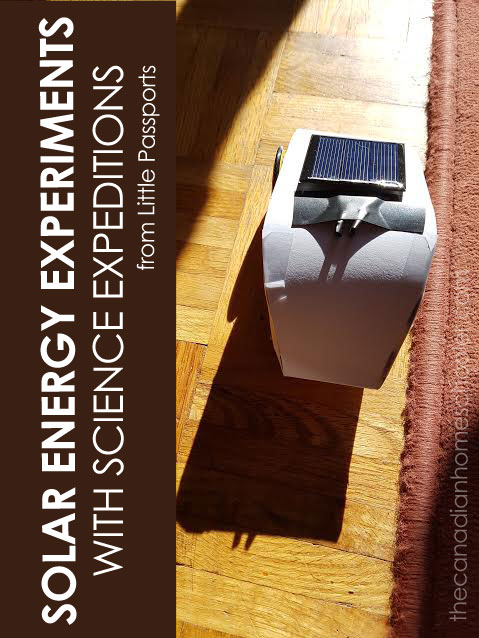
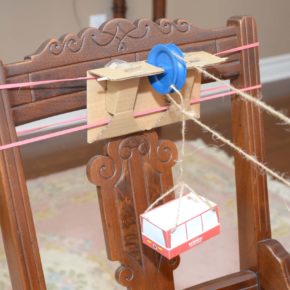
The first project in the box that my son grabbed was the solar powered car.
It was a little tricky to put it together, and definitely ended up being a 2 person job with the taping needed to get everything into place. A great opportunity arose to talk about electricity and the need to keep the red wires and black wires separate. My son was fascinated by the small solar panel that was needed for this build and I could see him brainstorming ideas on what else he could use it for.
We found some sunshine streaming into the house and gave it a test run. The first thing noticed was that it takes a minute for the sunshine to work its magic – it isn’t like an on-switch. But once it’s charged up, it goes! I advise not doing it on a carpet as the motor isn’t quite strong enough to push the car over that resistance, but on the hardwood or outside on the driveway, that car could travel crazy fast! There was much squealing from younger siblings as they chased around the little vehicle.

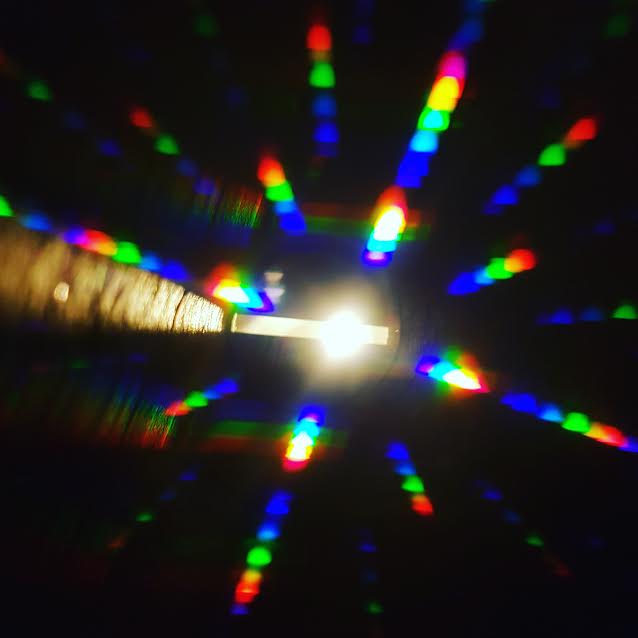
Next we made a spectroscope. This tool takes light and separates it into a spectrum of colours. Scientists use them to figure out what the sun and stars in space are made out of because different elements are spread out different wavelengths. It was really interesting to see how various light sources around our house presented different rainbow wave effects. (Remember – NEVER look at the sun directly!)
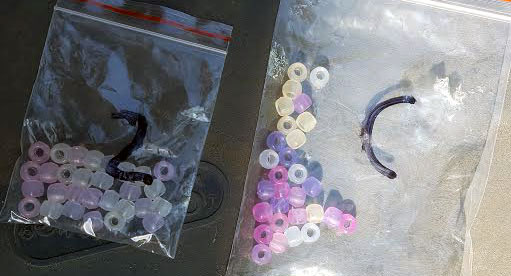
The last experiment in the box had us learning about Ultraviolet rays. Just off our visible light range at the purple end of the rainbow are ultraviolet rays. Most kids are familiar with the term UV because we warn them about sun burns. This was a great visual for how to protect yourself from the sun’s UV rays. In the kit is a bag of clear beads. After separating them into smaller bags, we thought of different ways that people protect their skin from the sun. Long clothing, hats, sunscreen, hiding in the shade… these were ideas my kids thought of. So off we went, trying our various bead bags with each of these. A control bag went into the sun directly and instantly, those beads went from clear to coloured. We put a bag under a hat, covered one in sunscreen, and put another in the shade. Amazingly, they all worked really well – staying pretty clear, although a few had some slight colouring. The sunscreen was a messy part of the project but demonstrated just what that cream does for our skin. A great visual for kids to see how much the sun actually affects our body.
I hadn’t realized before, but in the box was a website link to some bonus content on the Little Passports’ website. Each box has a special page that offers more tips and facts, videos, and extra notes about the projects – like advice from Aunt Charlie (who is a character in the comic strip) on how to best do your experiments. There are even an extra – like another project or a printable that you can do. This is a great add-on feature, and it really helped my very tech-geeky boy get more out of our kits.
AERODYNAMICS
When this kit arrived, we started guessing what would be inside the box. For sure, we thought there were going to be paper airplanes. Eagerly my science kid opened it up and we were surprised – no paper planes, but there WAS a paper rocket!
He got to work on the book, doing all the comics and activities that teach you more about the topic of the month first. Then he got to work on making the projects.
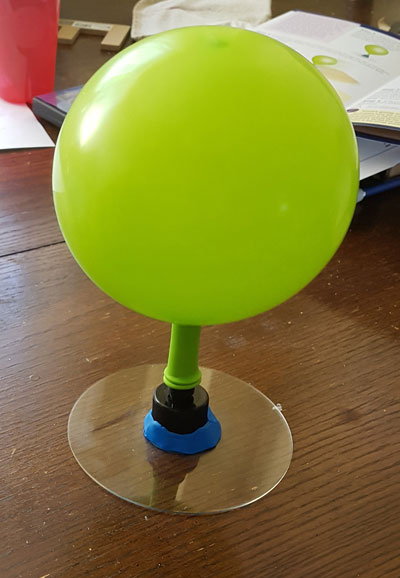
We started with a hovercraft. Our family has tried this in the past with moderate success, but our approach was different and I had to scramble around looking for all the things we need. Again, I love that everything is right inside the kit so you just need to grab the basic tools (like scissors and tape) and you can get started. This one took a little bit of teamwork. Blowing up balloons can be tricky and keeping them inflated while attaching them to the hovercraft was really hard for my 9-year-old. But together we managed to successfully get it built and launched. The younger siblings loved this – squealing as it floated across the floor. It took us a few tries to both find a good surface and to perfect the art of getting it started. Since hovercrafts use the downward force of air to propel itself above the surface, it’s able to smoothly slide across the floor. Our vehicle really liked to float to the same area of the room over and over again….. I’m guessing our floor isn’t level.
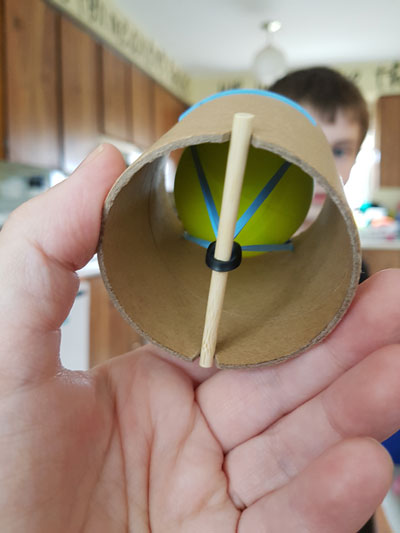
My scientist really wanted to work on the rest of the box himself, just to see if he could do it. Of course, the next project he picked was a ball launcher. In this project, you attach an elastic band into a small cardboard tube with a piece of dowel as a lock when you pull the elastic back. (Elastic Potential Energy, anyone?) Then you put a lightweight ping-pong ball inside, gently squeeze the bottom of the tube, and ….. POW! the dowel comes loose, the elastic snaps, and the ball goes flying across the room. My son was able to assemble this project without help, but did find the task of pulling the elastic back and “locking” the dowel in place a little frustrating. Probably because he was trying to push it down from the top instead of pulling it out the bottom. We actually tried a few different small balls that we had around the house – testing to see what results we had. We tried different launch techniques too, releasing the dowel manually instead of squeezing for example. It created a great opportunity to talk about making a hypothesis while experimenting.

We saved the best for last (in my opinion): The Stomp Rocket. The boy did all the creating on his own – carefully following the instructions to design his own paper rocket. He needed some help taping on the nose cone and fins. Using the box (I love how the company has incorporated even its packaging into the experiments!) we created a launch pad and then we headed outside.
I have to admit, this project was crazy fun. All the kids joined us out in our front yard as we tried to find a safe place to launch the rocket with losing it up in a tree or out on the road. We set it out on the driveway and got to launching. Each of the kids took a turn, some with more success than others, and eventually, they tried more than just a simple foot stomp. There were some crazy moments of super jumping onto the launcher to see if it would make a difference. I can’t say for sure that it did or not, but it was fun anyways.

Rockets are a great example of aerodynamics – using their pointy nose to push the air around the body and the fins to keep steady. When it is in the air, the rocket moves in sort of an arc shape, which is known as a parabola.
The kids loved the launcher so much, my son came running back from the community playground later that afternoon to grab it and use. When I looked down the street later, there were like 50 kids circled around the launcher and screeching excitedly every time it took off. They had a great time – at least until the rocket couldn’t handle it anymore and the paper tore. Thankfully, though, it’s not too hard to build another one!
I’m loving the special time with my kids this is providing – and the fact that we’re learning things without even “school.” 😉 The instructions for the experiments are so cleanly laid out with lots of diagrams for visual learners that it really makes it simple to follow, but it also includes lots of great information about the science behind the projects that you are doing.
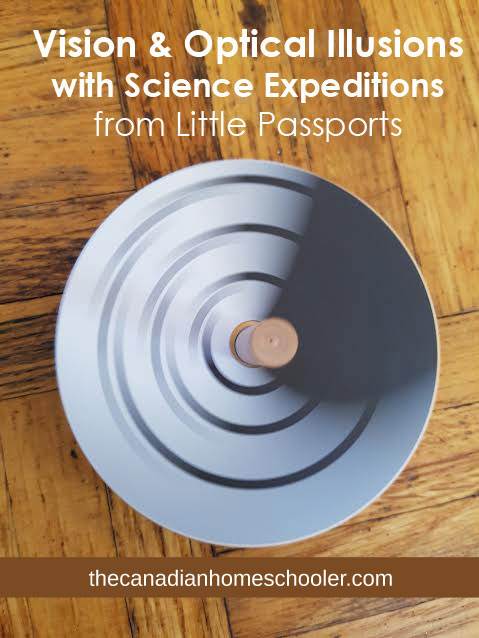
VISION & OPTICS
The box about Vision and Optics focused on how our eyes work and sometimes even deceive us. My aspiring scientist got right to work.
He started off by reading through the booklet that comes in the box. It has a comic strip about Stella and Sam and their discoveries about vision, some activities to try, and lots of facts and information. Then we pulled out the experiments.
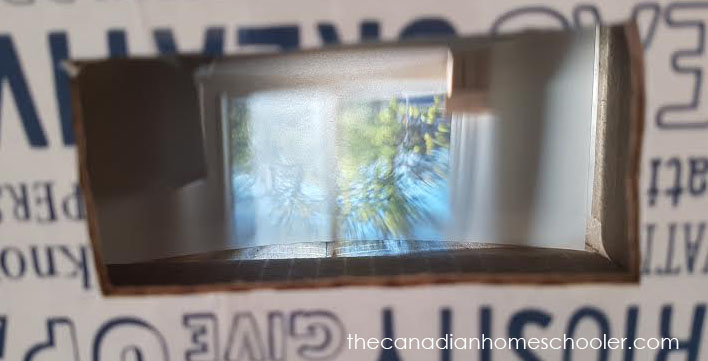
The first one we finished was a camera obscura – basically building a representation of how our eyes work. The light comes through our eye lens and is flipped upside-down onto our retinas. (Did you know that our brain then flips the images we see upright again so it makes sense to us? I thought that was amazing!) This project has you adding a lens to one end of a box, and then adding a piece of translucent paper to show exactly how the lens flips the image – you can see it on the paper! Honestly…. it was incredible and probably our favourite project in this kit. We kept going back to it over and over to retest it out. We found it a bit hard to find the perfect position to get a clear, crisp image, but it was a neat lesson to thin about how we focus things at different distances and think through problem-solving how we could recreate this project with an adjustable component.
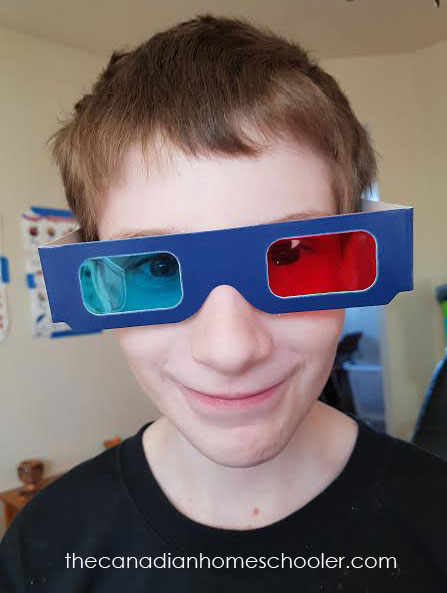
Next, we slapped on the pair of 3D glasses and checked out all the 3D postcards in the kit. Some of them were so effective that it seemed like you could totally poke your finger behind buildings! We pulled out a DVD of a short movie we have that’s 3D too – just to compare. If I’m being honest…. I can’t stand 3D films. They hurt my head and make me feel pretty nauseous, but my boys love them. It was good to be able to explain the science behind the 3D phenomenon to them. (Basically, our eyes each see their own image and merge them together to give us the view we see all the time. By placing a coloured film over each eye, it kind of tricks your brain into thinking it’s seeing two different views, creating the illusion that you are looking at something 3D. Neat, right?!)
From there we made spinning pictures – the kind that you have an image on each side of a paper, place it on a stick and twirl it around so that the images kind of blend together in your brain. They even sent a few blank pages so you can make your own.
Lastly, there is a top and a whole bunch of patterned and coloured circle discs to slip on the top before you spin it. We had a blast trying to think of what it would look like while it spun around. Some of them were pretty surprising. Especially the fact that you can actually see COLOURS appear from a disc that’s only black and white while it’s spinning….. and that science hasn’t really figured out why that happens! After testing all the pre-made ones, we made our own patterns on the extra circles. It was cool to discover that wiggly lines don’t really matter when it’s spinning – it still just seems to make a solid.
This month didn’t really require us to use the lab notebook from the first kit, but my little science kid excitedly added his new sticker badge to the front of the book and is looking for the arrival of another box.
I’m really enjoying these kits for a few reasons.
#1. Everything is in the box. Other than a few tools that are pretty common in homes – like scissors and tape, everything is all together in the kit. We can just grab it and get started.
#2. He can keep them in his science bag. He wants to keep EVERYTHING. I already have so much “stuff” around our house, I was sort of dreading a pile of science miscellany laying around (probably on my desk…). But it can all be tucked into the blue zippered bag that came in box #1. That means no mess for me, and he is more than happy.
#3. It gives me intentional one-on-one time with my son who loves science, doing something that isn’t classified as “school.” Funny how taking that word off a project makes it fun instead of work, eh? But, in this house of 5 kids, it can be hard to do things individually with each kid. This subscription forces me to stop and focus on my son as we work through it together. It allows me to enjoy our time together. It makes him feel special and that’s important.
OTHER BOXES
We completed a whole year’s worth of boxes, which also included experiments about:
- balance & acrobatics
- buoyancy
- sound
- caves & crystals
- elevators

WHAT IS GREAT ABOUT SCIENCE EXPEDITIONS BOXES:
We love that each Science Expeditions box has a new theme, all the materials inside that make it easy to just do the projects right away, extra resources and activities inside the booklet, and that there is a bag to keep all our “stuff” in along with a lab book for writing down observations.
We have enjoyed being able to test (and often retest) things, that we can show off our experiments to other family members and, at times, even neighbours.
The topics have been so diverse – allowing my Mr. Science to explore and discover different segments of science, learning which appealed to him the most and which didn’t. (He learned he doesn’t really enjoy biology as much as other science.)
As a parent, I’ve appreciated that there are often videos to help make experiments clearer, and also a heads-up email which lets me know a package is on its way and if I need any additional materials that aren’t in the kit.
WHAT WE FOUND HARD ABOUT SCIENCE EXPEDITIONS BOXES:
Some of the experiments really required a lot of adult participation – which was fine, for the most part, but at times left my son feeling discouraged and occasionally frustrated. But it did allow us the opportunity to really spend time together problem solving and working through the struggles and challenges.
OUR FINAL THOUGHTS:
After having used their boxes for a whole year, I can honestly say that I’ve found the Little Passports’ Science Expeditions subscription box program to be quality. The materials (other than a few small things) have been top-notch and sturdy. We can actually reuse much of them for future projects, if we want. There were so many things – both paper-based and hands-on that they really offered a lot of diversity for learning styles and needs. It easily could be used as a primary science source – especially if you wanted to go in depth more and explore throughout the month while you wait for the next box. It’s complicated enough to challenge not only kids at 9 or 10 years old, but also interesting enough for the older kids at like 14 or so. We found that even through concepts might have been too hard for some of the younger kids, they loved seeing and participating in the experiments anyway. For example, the stomp rocket was perfect for all ages and drew a huge crowd of neighbourhood kids of all ages. All in all, these boxes have been a wonderful addition to our school days. I have been completely impressed by them and feel like they would make a worthwhile investment to any family with kids who love or are curious about science.

Want your own Science Expeditions subscription? They are designed for kids ages 9+. The cost is $21.95 USD +shipping to Canada if you pay by the month, or you can go for a year subscription which drops the price to $18.95 USD a month. It’s an annual cost of $227.40 USD +shipping to Canada if you do it that way.
You can find out more and buy a subscription at: https://thecanadianhomeschooler.com/sciencepassports
Editor’s Note: This post was originally share in 2018, and has been updated in 2020 to include recent pricing and to compile all information about this product into a single post.

- How to Keep a Toddler Busy While Homeschooling - March 21, 2024
- 25+ Things Your Kids Learn From Video Games - March 20, 2024
- 10 Words For New Homeschoolers - March 20, 2024
I am happy you have been successful with your endeavour. Are there any high school packages? Thank you.
Hi Carole,
I don’t think the Litte Passports site have high school kits specfically, but I think it could be possible for older students to enjoy these kits as well.