Are you trying to figure out exactly what you need to do this year for your homeschooling and pulling it all together? Well, here is the ultimate guide to homeschool planning – a 5 step process to planning your homeschool year. I won’t say “easy” guide because there are parts of the process that take time and effort, but it’s not impossible!
This post contains affiliate and referral links.
Homeschool Planning Step One: Setting Subjects & Goals
The first real step to getting started with planning out your homeschool year is to put together a general overview of what you will teach and learn throughout the year. This could be as basic as what actual academic subjects you will teach (math, science, history, etc.), what topics you would like to learn through a unit study (like horses or space or dinosaurs) or it could be more ideas for specific targeted goals like “able to write in cursive” or “memorize all times tables to 12×12”. Make sure that your goals are developmentally appropriate and personalized to your child.
Ages 1 to 3 years old:
This age range is not about academics. It’s about learning through life and play. This age range is ideal to pick some simple goals for – things like life skills, language development, large motor skills (climbing on the playground) and some basic fine motor skills (how to hold a crayon.) This age should be non-pressure, non-stress for learning.
Preschool & Kindergarten:
This can be the start of early academic goals – such as learning to recognize letters and sounds or understanding and recognizing numbers up to 5. Another goal could be to learn how to print their name. This age group is also the perfect time to have goals around easy chores such as emptying the dishwasher, cleaning up toys, and putting laundry away. Unit studies are a fantastic way to teach and learn in this range because you can get hands-on and creative – a method that most young learners do well with.
Elementary Years:
Now you focus on a variety of academic and personal goals. Plans become more involved at this point but don’t get too complicated and too much. Decide to if you will (or need to) follow the government’s curriculum outlines or do your own thing. Consider what subjects you want to make sure you cover – like math, reading, and writing and what things you personally consider as extras. Ask your child what they want to study in a year to take into consideration their interests and curiosities.
Some ideas for getting them to help come up with ideas of what they want to accomplish in a year:
- Use a website that runs online classes – like SchoolhouseTeachers or Outschool then ask your child to look through the list of what they offer to see if anything catches their eye.
- Here’s an idea that you can do with your children – have them create a vision board for the year. Cut/paste pictures or words of things they want to accomplish or attempt throughout the
school year. You can divide up the page into sections to focus on, like academics, social, spiritual, physical, financial, etc. This is a great way to see what your child’s goals are, and to help them figure out what steps they need to take to get there. - Write a list of favourite topics or subjects they are curious about, then see how you can use these in your school year.
Grab a free daily student work checklist.
Middle School:
Most people consider this to be the pivot point between the early years and high school and want to increase the difficulty of the courses, independence of learning for kids, and more intentional with what they are learning. Of course, it doesn’t have to be – you can absolutely keep doing what you’ve been doing. Some suggestions are to begin to focus more on academics and use child-interests to find more intentional learning programs.
High School:
This 4-year period is generally where classes get more specialized. You need to decide at this point if you will try and accomplish an “official” diploma from the government through accredited programs or if you are just going to do your own thing and not worry about a diploma. In general, classes are divided into two sections: core subjects and electives. Core subjects are math, sciences, language arts, and social studies. Electives can be anything outside of these – special interest like photography, computer studies, business, or music. Get an idea of how many classes you want to complete in a year – these are known as credits. Credits are awarded based on the amount of hours completed on a subject or the amount completed of a course. This is a good time to evaluate passions and goals for your student’s current and future life. Planning a general overview of the full high school experience can be helpful to organize what subjects you are going to complete when.
Grab the High School Homeschooling Planner.
- Visit UniversityAdmissions.ca for more information on your options.
- Need some ideas for high school electives?
Remember, this step is just about figuring out what your goals are for the year and/or what subjects you want to cover. Don’t over complicate things.
Homeschool Planning Step Two: Finding Your Style & Approach
When you know what you want to learn and teach in the year, the next step is to look at the different ways that kids learn (and how to observe your kids to discover which they most likely are) and the different homeschool approaches used to teach.
Figuring out how your child learns:
There is some debate on the validity of learning styles, but they can be a helpful tool to consider as you observe your child. Learning styles believe that most people take in information better when it’s presented in a particular way. The main learning styles are: visual, audio, and kinetic.
Visual = seeing.
Auditory = hearing.
Kinetic = moving/doing.
For example, when you get a new piece of “assemble yourself” furniture, some people need to look at the pictures in the instructions or watch a video of how to put it together. Others need to read the steps out loud. And others need to jump and figure it out themselves.
Have you noticed what your child does when they are learning something? Is there a way that your child prefers to learn? They actually can often articulate exactly what they like the best, and what they really don’t like.
- Learn more about learning styles.
- Here is a quiz you can use to see if you can figure out what learning style your child is.
It is absolutely best to include a multi-sensory approach when teaching and learning. Using all your senses will help you retain inforamtion better than if you just absorb it in one way – but there can be a benefit to knowing how your child best learns so you can use that when needed.
Figuring out your preferred teaching style:
Homeschool affords the opportunity to approach learning and teaching from unique and outside the box points of view. Or you can go completely with the traditional way children are taught if you’d prefer. Some popular methods include Charlotte Mason, Classical, Unit Studies, Unschooling, and an eclectic approach where you take the best of all the others to make your own mix and match style.
- Learn more about homeschool methods.
- Take a homeschool style quiz too.
Remember, this step is just to kind of guide you to some curriculum options – you aren’t obligated to live and die by your homeschool methodology or your child’s learning style. This is just a tool to help you narrow down your focus. In reality, you will probably lean one way but pull from different philosophies and ideas, as well as resources that aren’t necessarily exactly what your child’s learning style is. Giving them room to experience and grow through different styles can really help cement learning – even if it’s not their natural inclination. Seeing how your child naturally solves problems is just a way for you to figure out options that will help you all be the most successful with this adventure.
Homeschool Planning Step Three: Curriculum Options
Choosing curricula is the one step that tends to overwhelm, panic, and stress people out and can be one of the hardest steps to take while homeschool planning. Let’s face it – there are SO many choices out there. It can be too many choices. My advice is to not just go search up “homeschool curriculum” online because you will get millions and millions of results. This is why you spent time on the last two steps. Knowing WHAT you want to teach and HOW you want to teach it helps narrow down those options.
Now, you have a few more questions to answer:
- Do you care if the curriculum is faith-based or not?
- Do you care if the curriculum has Canadian content?
- Do you want a program that is open & go with daily plans of exactly what you are to do or do you want more flexibility?
A note here: You will find that the homeschool market is saturated with Christian American resources. If you want something Canadian, prepare to mix and match because there currently isn’t a boxed set for Canadians. Also, there are some great secular resources out there, but again – you might need to search a little deeper.
Start with one subject per kid at a time while searching so you don’t get overwhelmed. When you find a potential fit, write it down on your page. If you find multiple options, write them down to compare. Instead of being general, try to search for exactly what you are looking for. Of course, this might not always work as not every combination will have a resource for it, but it’s a good place to start. For example, you can search “Homeschool math hands-on Charlotte Mason” and see what comes up as suggestions. Get as detailed in your search as possible. Don’t just check Google – look at other resources, too.
Reading reviews of products is a great way to get feedback on what works and what doesn’t for different homeschooling families. Read the testimonials on the company website, look through Pinterest, search for homeschooling blog reviews, see if there are any YouTube videos of people using the product. If you can go to a homeschool conference, meet the vendors, check out the materials, and chat with other homeschoolers about what they like and don’t like. Consider the price, the resell / reuse factor, and how much planning & prep work you as the teacher will need to do.
Some resources to help:
- Curriculum Purchase Planner – This post contains links to other homeschooling families and how they select their curriculum each year. At the bottom of the page is a planner you can use to figure out what you will use and a way to keep track of what you have bought / found already.
- Cathy Duffy Reviews
- The Big List of Canadian Curriculum
- Canadian Curriculum Showcase
Don’t be afraid to be creative either. There are a lot of amazing online classes and programs, digital and printable resources, and other unique options to choose from. Some examples of places to look for these kinds of resources:
When you’ve finally got everything picked out and planned – you need to buy what you need. Check out used curriculum sales first (but make sure you are only buying things that are allowed to be resold!) Facebook is a great place for this. Look for local and provincial swap groups. There is also a Canada-wide group. If you can’t find it for resale, keep an eye out for sales at stores and with publishers. The most common time for resources to be on sale is between April and September. If you like digital products, watch for homeschool digital bundle sales in that same time frame.
- Homeschool Canada: Swap on Facebook – Make sure you answer the questions to be accepted to the group.
Remember, this step is going to take time. It’s not always easy to figure out exactly what will be right for your child and your homeschooling adventures. And even if you think you’ve found something amazing… it might be a total flop. Curriculum is honestly a trial-and-error adventure with your kids. All you can do is choose what you think is going to work and then test it out.
Homeschool Planning Step Four: Breaking it Down
So, you’ve decided what you are going to be learning this year, how you are going to teach it, found and bought the curriculum you want to use…. now it’s time to get it all figured out and organized for the year.
What will your year look like?
Some thought is needed on how you want to lay out your year. You need to pick what will work for you and your family.
- Do you want to follow the traditional school year – September through June, with the same holidays and breaks?
- Do you want to school only for 4 days a week, keeping Fridays off for field trips and playdates, etc?
- Do you want to do “Sabbath School” which is 6 weeks of school followed by a resting 7th week off?
- Do you want to spread your school work out throughout the year and do year-round schooling with time off as you’d like through the year?
- Are there times and days in your year that you will need off?
Choosing a Planner
This step is all about breaking it down into smaller chunks so you know what you are doing when. Putting a plan in place can be helpful when you are tired, down, or a little behind your plan. It helps when you are dealing with multiple kids, someone gets sick, or you have to take time off and wonder where you were when you come back.
There are lots of different ways and methods for planners – options for DIY, digital, printed, and pre-made. You can just use a spreadsheet. You can make a bullet journal with your plans. You can use an official online homeschool or lesson planner. You can buy a teacher’s lesson planner. You can download a planner from a homeschool blogger or Etsy. I can’t tell you which one to use because this is a pretty personal preference, however, here are some ideas.
- My Simple Daily Lesson Planner
- Daily Student Checklists
- Here is the style of teacher’s lesson planner I have loved using in the past. It’s a landscape planner (so wide instead of tall) and can fit many subjects into a page layout. Great for multiple kids!
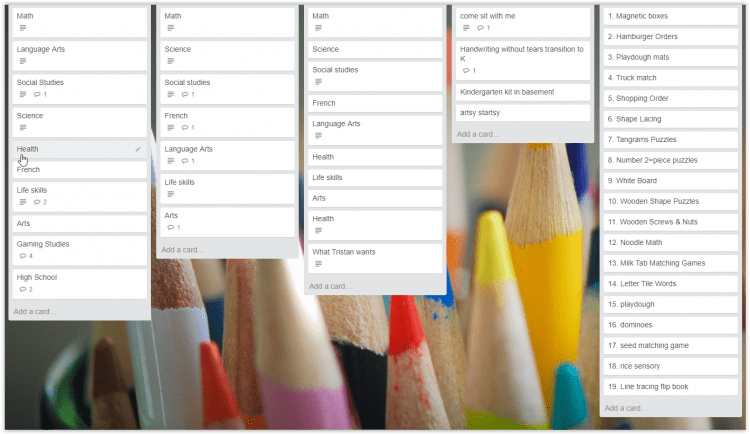
- Programs like Trello or Evernote are handy apps to keep all your notes and ideas. I use it to plan my year out. Here’s a screenshot of one of my Trello homeschool planning boards:
- There’s a popular online planner called Homeschool Planet.
- Some printable planner options: The Unorganized Homeschool Mom Planner – Deluxe Homeschool Planner
Some people like to have their planners have specific dates on them whereas others feel very trapped and panicky because if they miss a day their lessons are all messed up. If you are the latter, I recommend changing it to be Day 1, Day 2, Day 3 instead of specific calendar dates. Then if you miss a day, you still are on schedule because it’s by day number instead! You can break up the lessons too – for an example, try doing math and language every day, but alternate science and social studies.
When you have the planner and the year layout settled, it’s time to plunk the information in!
Another tip, if you are using a printed planner and are writing things in – use pencil. That way it’s editable and you can move things around as needed. Make sure any digital planner you have also offers a drag and drop option so you can change as you want.
Some curricula have suggested schedules included, so take that plan (if it works for you) and simply drop them into the planner where they are scheduled to be. If it doesn’t work for you, or there isn’t a schedule, go through the program and break it down into chunks. Traditional school years are typically broken up into 36 weeks or 180 days. Of course, this is just a guideline, but it can be helpful when you need to figure out how to schedule your plans. Break things down and add them to the planner. Do one thing at a time until you have everything down and – tada! Lessons all planned!
If you are feeling completely trapped by the thought and use of a planner … don’t feel overwhelmed or discouraged. You can write down the plan every day or every week instead of for the whole year if that’s too much. To be honest, you really just need to Do The Next Thing.
Remember, a planner is not a ball & chain. It’s just a visual way to see what you are working on. If any part of it is stressing you out or weighing you down, drop it.
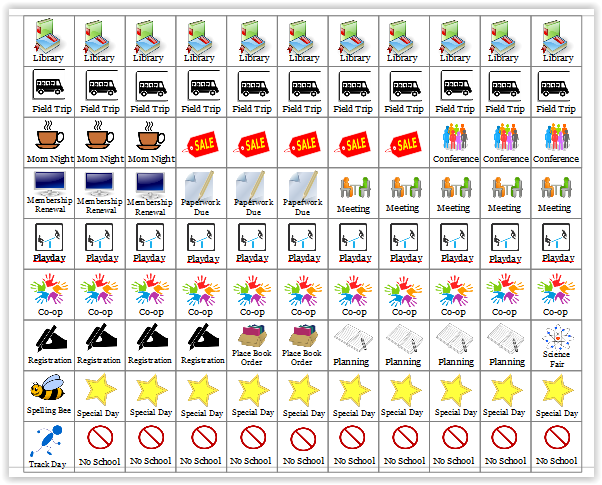
Bonus: Homeschool Planner Stickers!
Many family calendars and planners come with a set of stickers to highlight important events like birthdays, anniversaries, doctor appointments, etc. Most of these stickers include the traditional school things to remember, such as picture day and hot lunches. But homeschoolers need a different set of reminder stickers. So I’ve created a page full of them.
Included are stickers for:
- field trips
- co-op
- planning days
- library
- conferences
- placing book orders
- facilitator meetings
- registrations and website membership renewal
- paperwork due
- science fair, spelling bee, and track days
- other special days
- no school days
- playdates
- sales
- mom night out
Simply print out this page on a sticker paper sheet and cut out the ones that you need in your day planner or family calendar.
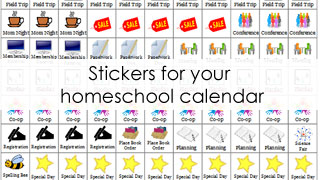
>> DOWNLOAD YOUR HOMESCHOOL PLANNER STICKERS<<
Homeschool Planning Step Five: Prep
At this point, it’s just about making the actual implementation of the plan easier. Since you already know what you are going to teach and when, you can spend some time getting everything organized. This step is about putting systems in place, so you are all set and ready to go for the year.
- Print and Sort Everything. Print out any worksheets or photocopy the pages you will need through the year and put them in file folders for the week or day they are supposed to be in. (Check out the Homeschool Crate System – it’s got some great ideas!) Make a book list per week so that you know what to get at the library before you need it.
- Buy your supplies. Get some good pencils (our favourite are the Staedtler Nordica pencils!) and any other school supplies you need. Organize them and have them easy to access. Get any science experiment materials you require and put them in a container. Get your workbooks or binders.
- Set up a system for your resources. Having a way to make it easy for you and your kids to grab what they need makes your school day much less complicated. Some ideas are to give each kid a box with their “stuff” in it. You can use colour coding and/or washi tape to label things per kid to make it even easier. There’s also a popular method called the WorkBox Method where each day you put a set of drawers or bins together with a subject work per box. This can be a lot of work, but some people find it helpful.
- Set up your school space. This can be as elaborate as a whole schoolroom or as simple as a shelf for books. Get everything set up and ready to go! Need help? Check out this eBook: How to Organize Your Homeschool in 20(ish) Days.
And finally….. breathe.
You are all set to go! Now you have everything in place to have a wonderful homeschool year!
Remember – the most important thing for a homeschool year is to enjoy learning. All the homeschool planning the world is pointless if you are always fighting or struggling or hating every minute. Just use these planning steps to help you succeed in your year, not to feel trapped by a plan. Enjoy learning with your kids. However it works for you.

- How to Keep a Toddler Busy While Homeschooling - March 21, 2024
- 25+ Things Your Kids Learn From Video Games - March 20, 2024
- 10 Words For New Homeschoolers - March 20, 2024
Thank you!! Always so helpful
Depending on province, you may need to add the step of registering with a homeschool authority (aka school/board).
Thank you so much! I am starting to homeschool in the fall and this has helped me significantly. Things don’t seem so overwhelming when they’re broken down like this.
Interesting material, useful for Canadian teachers . In Romania we have another form of education.
I worked with students, each in his own home, online during the pandemic.
Great read!! Thanks for sharing such a blog.